Monday, 26 September 2016

HEALTHY CHIROTE / KHAJA

Ingredients:

Wheat Flour - 1 C
Semolina - 1C
Clarified Butter - 1 tbspn
Water - 3/4 C - 1C
Sugar - 1C
Water - 1C
Lemon juice - 1 tbspn
Rice Flour - 1/4C
Clarified Butter - for greasing
Oil for frying

Directions:

1) In a mixing bowl add wheat flour, semolina and 1tbspn clarified butter and mix till crumbly. Now add water to knead a soft dough and set aside for 15 mins.


2) Now in a saucepan add equal amount of water and sugar and bring to simmer . We do not need to thick and too thin sugar syrup so keep stirring and checking the syrup.


3) After 15 mins, knead the dough for again 5 mins and make it soft. Make equal size balls from the dough and set aside. Now roll out one dough to a disc (Chapati like) and add grease with clarified butter and dust with rice flour and make a three fold paratha.....Now again roll to a disc (approx 10cms )and grease with butter and dust with rice flour and repeat the same process with another dough ball.
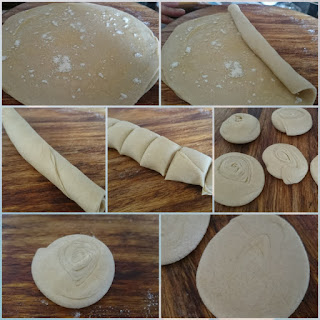
4) Now assemble one chapati over the other and roll like a frankie, and press gently and cut into pieces of equal sizes (approx 8 to 9). Now gently press these single cut dough with hand roughly, and set aside. Now take each ball and with a rolling pin press gently to give the desired shape, repeat same with all the dough.

5) In a frying pan heat the oil, and add the discs and fry on simmer till slight golden or till it turns crispy. Repeat same with all.

6) Now add the fried chirotes in the sugar syrup and leave for 15 mins.

7) Remove from the syrup and garnish with Saffron and almonds or dryfruits of your likings and serve hot....

* Can be stored for 2 days in air tight container.

                                                                       हिंदी में

सामग्री :
गेहू का आटा - १ कप
रवा - १ कप
घी - १ टेबलस्पून
पानी - ३/४ कप - १ कप
चीनी -१ कप
पानी - १ कप
नींबू का रस - १ टेबलस्पून
चावल  का आटा + घी
तलने के लिए तेल

विधि :

१ ) एक बड़े कटोरे में गेहू का आटा , रवा और घी डालकर अच्छी  तरह मिला ले। अब धीरे धीरे पानी मिलते हुए आटा  गूँथ ले। यह थोड़ा नरम होना चाइये और इसे १५ मिन मलमल के हलके गीले कपडे से ढक दे.

२) अब चाचनी के लिए समान मात्रा में चीनी और पानी ले और इसे ५ -७ मिन तक उबाले। यह ज़्यादा गाढ़ा  या ज़्यादा पतला  भी न हो। इसमें करची चलते रहे। इसमें थोड़ा निम्बू का रस भी डाल  दे।

३)  १५ मिन बाद भिगाये आटे  को फिरसे गूँथ ले और छोटे पेढ़े बना ले। अब एक पेढा  लेकर उसे पराठे की तरह बेल ले। अब ऐसे २ पराठे बना ले। अब एक पराठे के ऊपर थोड़ा घी और चावल का आटा लगाए और उसपे दूसरी बेली हुई रोटी रखे। अब फिरसे घी और चावल का आटा लगाकर (frankie) रोल करे। अब इस रोल्ड रोटी के छोटे छोटे टुकड़े काट ले.

४) अब इन छोटे गोलों को हाथ से थोड़ा दबाये और अलग अलग परत वाली साइड ऊपर रखे.

५) अब इसे हलके हाथ से बेल ले, और सुनहरे होने तक धीमी आंच पे तल ले.

६) अब इन तले हुए खाजे को चाचणी में १० -१५  मिन दाल दे।

७) अब चाचणी से निकालर केसर और अपने मनपसंद ड्राई फ्रूट्स के साथ गार्निश कर सर्वे करे.


Wednesday, 27 July 2016

EGGLESS PAV / BUNS

Ingredients :


All Purpose Flour - 2 Cups (250 gms)
Milk - ¾ Cup  (190ml)
Butter - 2 Tsp (10 gms)
Milk Powder - 1½ Tbsp (15 gms)
Instant Yeast - 2 Tsp  (8 gms)
Sugar - 1 Tbsp (15 gms)
Milk & Butter - For glaze 
Oil - 1 tspn
Salt - 1 Tsp / 5 gms

Directions :

1) In a lukewarm milk add sugar and yeast and stir till completely dissolved. Keep this aside for 10- 12 mins to yeast to proof, if the yeast  mixture does not froth do not use the yeast mix (* May be the water was too hot or the yeast was not good.)

2) In a large bowl add all purpose flour, milk powder and salt ,make a well in the center and add our yeast mixture and knead to a sticky dough. Do not worry if it is too sticky. Now on the kitchen platform dust with the all purpose flour and remove the sticky dough on the platform and add butter and keep kneading till you get a nice elastic dough. (Approximately 10 -15 mins) 
* If u have a electric blender, add the hook attachment and knead the dough in the bowl for 3 to 5 mins.

3) Now grease a big bowl with oil or butter and dump our elastic dough and cover it and set  aside for 45 mins to 1 hr near some warm place in your kitchen. (* the dough should be doubled in size) 

4) After 45 mins deflate the air from the dough which has doubled in volume and make 15 - 16 balls (like we make for chapatis) and keep in the greased baking tray and cover with the kitchen towel and let it rest for 45 mins. All these beauties will puff up again double.

5) Preheat the oven @ 200 C

6) After 45 mins brush the balls with some milk very carefully and take care you don't deflate any of air from the pav. ( you can add even sesame seeds if you like.)

7) Bake these for 12 -15 mins @ 200 C, or till slight golden brown on top.

8) Remove from the oven and brush with some butter ,it will be best after 12 hrs.

To see the softness of the buns, see the video 


                                                         हिंदी में 
सामग्री :

मैदा - २ कप 
दूध - ३/४ कप 
बटर - २ टीस्पून 
दूध पाउडर - १+ १/२ टेबलस्पून 
यीस्ट - २ टीस्पून 
चीनी - १ टेबलस्पून 
दूध + बटर - चमक के लिए 
तेल - १ टीस्पून 
नमक - १ टीस्पून 

विधि :

१) गुनगुने दूध में चीनी और यीस्ट डाल के मिला ले जब तक चीनी घुल जाए,  अब इसे १० - १५ मि तक ढक  के रख दे (अगर इसमें खमीर ना दिखे तो इसे इस्तेमाल मत करे, इसका मतलब यह है की एक तो यीस्ट ख़राब है अथवा दूध ज़्यादा गरम था। )

२)बड़े कटोरे में मैदा, दूध पाउडर और नमक ले , इसमें अब हमारा यीस्ट मिश्रण डाल दे और अछि तरह मिला ले। यह एक चिपचिपा सा आटा दिखेगा, डरिये मत। अब किचन प्लेटफार्म पे थोड़ा मैदा फैला ले और उसपे हमारा यह चिपचिपा आटा दाल दे और २ टीस्पून बटर डालकर  १० - १५ मं तक गुंदे , इसे तब तक गुंदे  जब तक यह एक मुलायम सा आटा  न बन जाये। 
* अगर इलेक्ट्रिक ब्लेंडर है तो यह प्रक्रिया आप हुक अटैचमेंट लगाकर ३ -५ मि तक गूंद सकते है। 

३) अब इसे तेल लगे बड़े कटोरे में डाल दे और ढक कर किसी गरम स्थान में ४५ मि - १ घंटे तक रख दे।  यह आटा  दोगुना फूल जायेगा 

४) ४५ मि बाद इसे फिर से किचन प्लेटफार्म में डालकर १ -२ मि गूंद ले , अगर आवश्यकता लगे तो थोड़ा मैदा भी ले सकते है , ध्यान रहे की ज़्यादा मैदा ना ले। अब इस आटे  के गोले बना ले जैसे हम रोटी के लिए बनाते है। इस आटे से १५ - १६ पाव बनेंगे, तो इसके १५ या १६ गोल पढ़े बना ले और ग्रीज़्ड टिन  में रख दे। (आप केक तीन ले सकते है, बेकिंग ट्रे या फिर बेकिंग डिश ). अब इन्हें एक मलमल के कपडे से ढक कर  ४५ मि तक रख दे , यह फिरसे दोगुने फूल जायेंगे। 

५) ओवन को प्रीहीट कर ले @ २०० C

६) ४५ मीन्स के बाद , बड़े ही नाजुक हातो से सारी ऊपरी हिस्सो में थोड़ा दूध ब्रश करे , इससे ऊपरी सुनहरा रंग आएगा , (आप चाहे तो तिल  भी लगा सकते है। )

७) अब इन्हें १२ - १५ मि २०० C में बेक करे , नहीतो तब तक बेक करे जब तक ऊपरी परत सुनहरी हो जाये।  ज़्यादा बेक भी ना करे इसे पाव कड़क हो सकते है। 

८) ओवन से निकाल कर ब्रश से थोड़ा बटर लगा ले , इस से ऊपरी परत सॉफ्ट रहेगी। और यह १२ घंटे बाद बेहतरीन लगेंगे। वैसे तो आप १५ मं बाद भी खा सकते है, लेकिन ६ से ८ घण्टे बाद स्वाद और बढ़ेगा। 


Monday, 25 July 2016

BHARWA BHINDI /OKRA

Ingredients :

Lady finger /Okra Small - 1/2 kg
Gram flour - 3 tbspn (roasted)
Groundnuts - 2 tbspn (roasted & grinded)
Dry mango powder - 1 tspn
Coriander powder - 2 tspn
Red Chilli powder - 2 tspn
Turmeric powder - 1 tspn
Cumin powder - 1 tspn
Chaat Masala - 1 tspn
Fennel seeds powder - 2 tspn
Cumin seeds - 1 tspn
Dried Fenugreek Leaves - 1 tspn
Garlic cloves - 8 to 10 (finely chopped)
Lemon juice - 2 tbspn
Salt to taste
Oil

Directions :

1) Wash ,wipe very dry and remove the pods of all the Lady's finger /Okra and slit them vertically, carefully noting that you don't make two halves of the Okra.It should only be a slit from half inch from the ends .

2) Now on a skillet/tawa drop all the Okra and drizzle some oil around 2 tspn and just roast them till they become tender and you see some brown spottings on the Okra. It will approximately take 6 -7 mins. keep flipping the Okra as it should be tender from all sides.

3) Now in a blender we will add all our dry spices Gram flour nicely roasted + grinded Groundnuts+Dry mango powder+Coriander powder+Red Chilli powder+Turmeric powder+Cumin powder +Fennel seeds powder (Roast the fennel seeds & grind )+Dried Fenugreek Leaves + salt and blend well in a blender. Remove from the blender and add lemon juice and 2 tspn of oil and mix well.

4) Now fill this masala filling in the roasted tender Okra. Fill it completely.

5) In a hot Iron Kadhai or pan, add 2 tblspn of oil , add the cumin seeds and garlic and saute it about 2 mins. Now add the stuffed Okras in the garlic oil and distribute evenly in pan, do not over load the pan, just check each Okra gets its own place and not one above the other. Just toss the pan so the garlic oil gets coated to all the Okra. Drop all the remaining masala stuffing what we stuffed in Okra into the pan and toss again. Add a tbspn of lemon juice and let it cook for 4 to 5 min on medium flame. Add Salt and Chaat Masala on top

6) Garnish with fresh Coriander leaves and serve with phulkas.

Friday, 22 July 2016

INSTANT RAWA DOSA

Ingredients:

Rawa/Sooji - 2 cups
All purpose Flour - 1/2 cup
Rice Flour - 1 cup
Gram flour - 2 tbspn
Freshly grated coconut - 2 tbspn
Cumin seeds crushed - 1 tbspn
Black pepper crushed - 1 tbspn
Cashew coarsely grounded - 2 tbspn
Ginger chilli paste -  1 tbspn
Coriander leaves chopped - 1/2 cup
Oil/Butter to grease
Salt to taste
Water

Directions :
1) Mix all the ingredients in a bowl with at least 5 to 6 cups of water or even more. The consistency of the batter should be very thin and of pouring consistency .

2) On a hot griddle, brush some oil or Clarified butter , pour the batter in a round direction and do not fill the pores created, this will only give the rawa dosa texture. drizzle some oil/ butter to get the crispy dosa .See video for same.

3) Let the dosa cook on low to medium flame from all directions, to get that texture and color wait till the dosa automatically loosens up from the ends and comes out clean.

4) Serve hot with any desired chutney.


                                                                           हिंदी में 

सामग्री :
रवा/सूजी - २ कप
मैदा - १/२ कप
चावल आटा - १ कप
बेसन - २ टेबलस्पून
कसा  हुआ नारियल - २ टेबलस्पून
जीरा मोटा पीसा - १ टेबलस्पून
काली मिर्च मोटी पीसी - १ टेबलस्पून
काजू दरदरा पिसा - २ टेबलस्पून
अदरक मिर्ची पेस्ट - १ टेबलस्पून
धनिया कटा - १/२ कप
तेल/ घी
नमक स्वाद अनुसार
पानी

विधि :
१) सारी  सामग्री ५ से ६ कप पानी में मिला ले और कोई घुटली न रहे। यह एकदम पतला होना चाइये एकदम  पानी जैसा।

२) नॉन स्टिक तवा पे थोड़ा घी /तेल लगा ले हमारा डोसा का घोल फैला दे। अधिक जानकारी क लिए वीडियो देखे।  फिर थोड़ा तेल या घी लगाए इस से कुरकुरा डोसा बनेगा।

३) डोसा को धीमी से मध्यम आंच में पकने दे, जब तक किनारों से डोसा अपने आप निकल आये। डोसा का रंग और टेक्सचर के लिए इसे धीमी आंच पे ही पकने देना बहोत  जरुरी है।

४) अपने मनपसंद चटनी के साथ गरमा गर्म परोसे। 

Wednesday, 20 July 2016

INSTANT DHOKLA

Ingredients :

Gram flour - 2 cups
Semolina - 1 tbspn
Sugar - 2 tspn
Citric Acid - 1 tspn
Ginger Chilly paste - 2 tspn
Turmeric - 1/2 tspn
Eno fruit salt - 1 tspn
Asafoetida - 1/2 tspn
Oil - 2 tbspn
Salt to taste
Lukewarm water to mix

For tempering 
Oil - 1 tbspn
Curry leaves - 10 - 12
Green chilli or red chilli - 3 to 4
Mustard seeds - 2 tspn
Sugar - 2 tspn
Water - 1/2 cup


Directions :
1) In a mixing bowl add gram flour,semolina, sugar , citric acid and mix well with the lukewarm water. The consistency should be not too thick nor too thin..Let it rest for 20 mins.

2) Till then ,grease the pan in which you will pour the batter with little oil and set aside. Put on the steamer on low flame for 10 mins.

3) After 20 mins, add salt, turmeric ginger chilli paste and mix well. Now when you see your steamer is ready put the Eno fruit Salt and mix vigorously to create air in the batter and instantly pour the batter in the greased tin and put it in the steamer and cover with the lid .

4) Let it steam for 25 mins on high flame and do not open the lid at all for 25 mins, and let the steam do its magic.

5) Till then make the tempering , by adding mustard seeds in hot oil, when they splatter add the curry leaves and slit green chillies and add sugar and add water and let it boil till the sugar gets dissolved.

6) After 25 mins open the lid , check if the dhokla is done by inserting toothpick in the center, if it comes out clean it is done , if not let it cook for 5 mins more. Ones nicely cooked, let it cool for 10 mins and cut into desired shapes. Add the tempering now let it soak for 10 mins .

7) Garnish with fresh coriander and serve .

                                                                     हिंदी में
सामग्री :
बेसन - २ कप
रवा/ सूजी - १ टेबलस्पून
चीनी - २ टीस्पून
सिट्रिक एसिड - १ टीस्पून
अदरक मिर्ची पेस्ट - २ टीस्पून
हल्दी - १/२ टीस्पून
eno फ्रूट साल्ट - १ टीस्पून
हींग - १/२ टीस्पून
तेल - २ टेबलस्पून
नमक सस्वाद अनुसार
गुनगुना पानी मिलाने क लिए

तड़के के लिए
तेल - १ टेबलस्पून
कड़ी पत्ता - १० से १२
हरी /लाल मिर्च - ३ से ४
राई - २  टीस्पून
चीनी - २ टीस्पून
पानी - १/२ कप

विधि :
१) एक बड़े कटोरे में बेसन, रवा/सूजी , चीनी ,सिट्रिक एसिड तो गुनगुने पानी से मिला ले।  यह ज़्यादा गाढ़ा न हो।  इसे ढक  कर २० मिं के लिए रख दे।

२) तब तक जिस भी केक टिन  अथवा बर्तन में आप ढोकला का मिश्रण डालने वाले है उसे थोड़ा तेल लगाकर रखे, और स्टीमर को धीमी आंच पे रखे।

३) २० मिं  बाद , बेसन के घोल में हल्दी, अदरक -मिर्ची का पेस्ट और नमक डालकर अच्छी तरह मिला ले। इसमें थोड़ा तेल भी दाल दे और मिला ले।  जब स्टीमर अच्छी तरह गरम हो गया हो तो बेसन के घोल में Eno फ्रूट साल्ट डालकर जल्दी से फेट ले , ये डालते से ही बेसन के घोल में खमीर आएगा और यहाँ घोल दो गुना बढ़ जायेगा। इसे फटाफट हमारे ग्रीसद टिन  में डाल  दे और स्टीमर में ढक कर रख दे।

४) इसे २५ मिं तेज आंच पे स्टीम होने दे। २५ मिं बिलकुल ढक्कन ना खोले, २५ मिं बाद टूथपिक /चाकू डालकर चेक करे अगर चाकू साफ़ निकलता है तो आपका ढोकला बन गया है अगर नहीं तो ५ मिं  और पकने दे।

५) तब तक तड़का बना ले , गरम तेल में राई  डाले, फिर कड़ी पत्ता ,मिर्ची और चीनी डालकर २ मिं पकने दे , अब १/२ कप पानी डाले और चीनी घुलने तक उबाले।

६) २५ मिं  बाद ढक्कन खोले और ढोकले को स्टीमर से बहार निकाले और तड़का अच्छी तरह फैलाकर दाल दे।  १० मं बाद इससे काट ले।

७) हरा धनिया डालकर परोसे।


Monday, 18 July 2016

MAC N CHEESE PASTA

Ingredients :
Macaroni - 3 cups
Carrots - 1/2 cup finely chopped
Capsicum - 1/4 cup finely chopped
Sweet corn kernels - 1/2 cup
Garlic Cloves - 5 to 6 thinly sliced
Pasta Seasoning - 2 tspn
Red chilli flakes - 1 tspn
Black pepper crushed - 1 tspn
Sugar - 1tspn
Parmesan cheese - 2 tablespoon
Milk - 2 cups
All purpose flour - 1 tablespoon
Olive oil - 1 tablespoon 
Butter - 1 tablespoon
Salt to taste
Water

Directions :
 1) Add the pasta in boiling water and add 1 tablespoon oil and 1 tspn Salt, let it cook for 4 to 5 mins, we don't want macaroni to be cooked completely so keep stirring. After 4 mins drain the macaroni and set it aside.

2) In a pan add butter and olive oil when butter melts add the thinly sliced garlic and saute for a min or till slightly golden . Then add our chopped veggies such as Carrots,Capsicum, sweet corn ( you can add any veggies you like, mushrooms, broccoli, peas etc.) and sauté for 2 to 3 mins, after that add a tablespoon of all purpose flour and sauté with the veggies and add some salt to taste, saute the flour till it slightly changes its colour..(do not burn the flour so be careful and keep stirring )

3) Add the milk and mix well and check there should be no lumps, ones you see the milk is simmering from the edges add the cheese and stir well, and then add the drained macaroni.  Drop all our spices of pasta seasoning, red chilli flakes, freshly crushed black pepper and sugar and mix very lightly and carefully as the macaroni should not break, be very gentle. If the pasta thickens up and the pasta water which we drained or else 1/2 cup water and stir well. 

4) Garnish with some dried oregano and crushed black pepper and Serve hot with garlic bread, its the best combo.


                                                                      हिंदी में

सामग्री :
ज़्यादा चीज़ के साथ 


मैकरोनी - ३ कप
गाजर - १/२ कप बारीक कटे
शिमला मिर्च - १/४ कप बारीक कटी
स्वीट कॉर्न के दाने - १/२ कप
लहसुन - ५ से ६ पतले कटे हुए
पास्ता सीसनिंग - २ टीस्पून
लाल मिर्च पपड़ी - १ टीस्पून
काली मिर्च - १ टीस्पून बारीक़ कुटी हुई
चीनी - १ टीस्पून
दूध - २ कप
मैदा - १ टेबलस्पून
ऑलिव तेल - १ टेबलस्पून
बटर - १ टेबलस्पून
नमक स्वाद अनुसार
पानी

विधि :
१ ) उबलते हुए पानी में मैकरोनी के साथ नमक और तेल डाले। इसे ४ से ५ मिं तक उबलने दे। ध्यान रहे की हमें मैकरोनी को पूरी तरह पकाना नहीं है।  ४ मिं  बाद इसे पानी से निकल कर अलग रख दे।

२) एक गरम कढ़ाई में मक्खन और ओलिव तेल डाले, इसी में बारीक कटा लहसुन डालकर १ मिं तक पकए और सुनहरा होने दे। अब इसमें बारीक कटी सब्जियां डाले, गाजर, शिमला मिर्च ,स्वीट कॉर्न के दाने ( आप अपनी पसंद की सब्जियां भी दाल सकते है, जैसे मशरूम, मटर, ब्रोकली ... ) अब इसे अच्छे से २ से ३ मिं पकने दे। अब इसमें १ बड़ा चम्मच मैदा डाले और अच्छी तरह भून ले, ध्यान रहे की मैदा का रंग ना  बदले और जले भी नहीं और नमक डालकर इसे अच्छी तरह मिला ले। अब इसमें दूध डाले और सारी सब्जियों के साथ मिला ले , ध्यान रहे कोई गुठलियां ना रहे, जब दूध थोड़ा उबलने लगे इसमें हमारी उबली हुई मैकरोनी एक साथ दाल दे।

३) अब लाल मिर्ची पपड़ी, कुटी काली मिर्च , पास्ता सीसनिंग और चीनी डालकर हलके हाथो से मिला ले।  चख कर देख ले अगर नमक की जरुरत लगे तो अपने हिसाब से दाल दे। अगर पास्ता गाढ़ा लगे तो १/२ कप पनि मिला कर २ -३ मिं ढक कर पकने दे।

४) गार्निश के लिए कुटी काली मिर्ची ,पास्ता सीसनिंग के साथ गरम परोसे , यह क्रिस्पी गार्लिक ब्रेड के साथ बड़ा  ही स्वादिष्ट लगता है।


Friday, 15 July 2016

METHI MUTTER MALAI

Ingredients :
Serves : 3 - 4 people
Fenugreek Leaves - 3 Cup
Frozen Peas - 3/4 Cup
Onions - 1 medium sized
Ginger - 1 inch piece
Chillies - 2 to 3
Cashewnuts - 10-12
Khoya/Mava - 2 tbspn
Milk - 1/2 cup
Cream - 1 tbspn
Sugar - 1 tspn
Dried fenugreek leaves - 2 tspn
Salt to taste
Ghee - 1 tbspn
Water as required

Directions :
1) In a boiling water add cashews, onions, green chillies, ginger and boil for 7 - 10 mins, or till the onions becomes translucent and changes its color. When cooled completely drain the water and make a smooth paste of the boiled ingredients.


2) In another boiling water add all the fenugreek leaves and boil for 3 - 4 mins and transfer it to a ice bath (ice cold water,this will ensure the colour remains same after boiling) and then squeeze all the water from d leaves and set it aside. Make sure there remians no water in the leaves

2) In a hot pan add ghee and cinnamon stick and let it simmer for 1 min, after that add the grounded paste of the onions and cook for 2 min, then add khoya/mawa and mix well with the onion paste, check there should be no lumps, cook this for 1 min and later add milk and cream and cook  for another 3 -4 mins. Add water if required, if the gravy thickens add half 4 -5 tablespoon of water and let it simmer more.

3) Now add the fenugreek leaves all into the gravy and stir continuously till all the leaves are separated and blended well in the gravy, than add the green peas and cook this for 2 mins on low - medium flame. Add sugar and salt as per your taste.  Add the crushed dried fenugreek leaves and simmer for 1 min.

3) Serve this creamy and rich methi mutter malai with any Indian bread.


                                                                          हिंदी में 
सामग्री :
मेथी - ३ कप
प्याज - १
अदरक - १ इंच टुकड़ा
दालचीनी - १ टुकड़ा
हरी मिर्च - २ से ३
काजू - १० से १२
मावा - २ टेबलस्पून
दूध - १/२ कप
मलाई - १ टेबलस्पून
शक्कर - १ टीस्पून
कसूरी मेथी - २ टीस्पून
घी - १ टेबलस्पून
नमक स्वाद अनुसार
पानी

विधि :
१) उबलते हुए पानी में प्याज,काजू,हरी मिर्च, अदरक डालकर ७-१० मिं तक पकाए। जब तक प्याज का रंग बदलता हुआ दिखे तब तक पकए। ठंडा होने पर पानी से निकाल कर इसका मुलायम पेस्ट बन ले।

२) दूसरे उबलते हुए पानी में सारी मेथी डाल दे और ३ मिं  तक उबाले , इसे तुरंत बर्फ वाले पानी में डाले और  रखे , जब पूरा ठंडा हो जाये तब मेथी काे पूरी  तरह पानी से निचोड़ ले,और मेथी को कुछ पानी ना रखे।

३) अब कढ़ाई में घी डाले और दालचीनी, इसे १ मिं  तक तेज आंच पे पकने दे , अब आंच धीमी कर के इसमें हमरा प्याज का मसाला पेस्ट डाल दे और २ मं तक पकाए , अब इसमें मावा डाले और अच्छी तरह मसलों क साथ मिला ले , अब दूध और मलाई दाल कर ३ -४ मं तक पकाए अगर ग्रेवी ज़्यादा गाढ़ी लगे तो थोड़ा पानी मिला सकते है और धीमी आंच पर एक उबाल अने तक पकाए।

४) अब इसमें मेथी डालकर अच्छी तरह मिला ले जब तक सररि पत्तियां अलग अलग ग्रेवी में मिल जाए , और अब इसमें मटर भी दाल दे और २ मिं तक पकाए , अब इसमें थोड़ी चीनी और स्वाद अनुसार नमक डाले। जब उबाल आ जाये कसूरी मेथी डालकर और १ मिं  पकने दे

५) गरमा गरम रोटी के साथ परोसे।


Wednesday, 13 July 2016

FALAFEL & HUMMUS

Ingredients for Falafel


Garbanzo beans/Chickpeas - 1+1/2 C (soaked overnight)
Onions Chopped- 1C
Coriander chopped - 1C
Garlic - 2 cloves
Cumin powder - 2 tspn
Cumin - 1tspn
Coriander powder - 1 tspn
Red chilli powder - 2 tspn
Black pepper powder - 2 tspn
Baking soda - 1/4 tspn
All purpose flour - 1 tablespoon
Salt to taste

Directions :
1) In a blender or a food processor add the chickpeas +onions+Coriander+garlic+Cumin powder+Cumin+Coriander powder+Red chilli powder+Black pepper powder+Baking soda+All purpose flour and blend to a bit grainy paste, don't make a smooth paste.

2) Remove from the blender and add salt as per your taste.

3) Make balls or almond shapes from this grounded paste and deep fry on medium to high flame. It will take approximately 4 - 5 mins to turn nicely brown outside. Fry these balls in hot oil, if the oil is not hot it may splatter and break into the oil.

4) Use these falafel with the pita pockets, or serve with freshly made hummus. It tastes awesome just like that.....


                                                                      हिंदी में 

फ़लाफ़ेल बनाने की सामग्री :
काबुली चना - १+१/२ कप (रात भर भगाया हुआ )

प्याज कटा - १ कप
धनिया कटा - १ कप
लहसुन - २ कली
जीरा पाउडर - २ टीस्पून
साबुत जीरा - १ टीस्पून
धनिया पाउडर - १ टीस्पून
लाल मिर्च पाउडर - २ टीस्पून
काली मिर्च पाउडर - २ टीस्पून
बेकिंग सोडा - १/४ टीस्पून
मैदा - १ टेबलस्पून
नमक - स्वाद अनुसार

विधि :

१) बड़े ग्राइंडर जार में काबुली चना+प्याज कटा +धनिया कटा +लहसुन +जीरा पाउडर +साबुत जीरा +धनिया पाउडर +धनिया पाउडर +लाल मिर्च पाउडर +काली मिर्च पाउडर +बेकिंग सोडा +मैदा  सब डालकर एक मोटी पेस्ट बना ले। इसे ज्यादा स्मूथ पेस्ट न करे।

२) एक कटोरे में इसे निकल ले और स्वाद अनुसार नमक डाले।

३) इसके निम्बू के अकार जितने गोले बन ले और तेज से मद्धम आंच पे तले , इसे अच्छे से पकने में ४ से ५ मिं  लगेंगे। इसे गर्म तेल में ही डाले नहीं तो यह फैट सकते है।

४) इसे पीटा पॉकेट में डालकर या फिर हमंस के साथ या फिर गरमा गरम टोमॅटो केचप के साथ भी परोस सकते है।


Monday, 11 July 2016

PANEER BUTTER MASALA / PBM

Ingredients :

Cottage cheese - 250 gms
Red Tomatoes chopped -7- 8 medium sized 
Cashewnuts - 12 -15 grind into smooth paste
Ginger paste - 2 tablespoon
Black Cardamon - 1
Cinnamon stick - 1 inch
Mace - 3 to 4 strands
Red Chilly powder - 2 teaspoon
Coriander powder - 1 teaspoon
Dried Fenugreek Leaves - 2 teaspoon
Sugar - 2 tablespoon
Milk - 1 cup
Cream - 2 tablespoon
Butter - 2 tablespoon
Salt as per your taste
Water

Directions :- 


 1) In a pan add the cube of butter and drop all the dry spices such as Black cardamon ,mace, cinnamon stick and let it sizzle with the melting butter for 1 min, when you start smelling all the aromas of the spices drop all the tomatoes, add a teaspoon of salt (that will make tomatoes to cook faster ) and a tablespoon of sugar and cook  till soft .Then add a cup of milk and let it cook further for another 3 -4 min till you see the change in color of the tomatoes or till you see tomatoes are mushy. Let it cool and grind to a smooth paste.

2) In a pan , add 1 tablespoon of butter and add the cashew and ginger paste and saute for 2 mins. Add red chilli powder + Coriander powder + 1 tablespoon sugar and Then pour all the grinded tomato paste and cook for 4 -5 mins on low to medium flame.When you see the gravy is simmering Add the cream and mix well and let it cook for another 2 mins after that turn of the flame. Sift this gravy with the help of sieve, this is a very important step , this will ensure that there are no lumps and the gravy is smooth and silky. 

3) Transfer this smooth gravy again into the pan and add 1/2 cup of water and cook till simmering. Sprinkle the crushed Dried fenugreek leaves and to get that texture like the restaurant ,grate a cube of cottage cheese into the gravy and then add all the cottage cheese cubes and cook for 1 min. 

4) Garnish with few Fenugreek leaves and grated cottage cheese and cream and serve with Naan or any Indian bread.


                                                                      हिंदी में 

सामग्री 
पनीर - २५० ग्राम 
लाल टमाटर कटे हुए - ७ से ८ मध्यम 
काजू - १२ से १५ पेस्ट 
अदरक पेस्ट - २ टेबलस्पून 
बड़ी इलाइची - १ 
दालचीनी - १ इंच 
जावित्री - 3से ४ किनार 
लाल मिर्च पाउडर - २ टीस्पून 
धनिया पाउडर - १ टीस्पून
कसूरी मेथी - २ टीस्पून
चीनी - २ टेबलस्पून 
दूध - १ कप 
क्रीम - २ टेबलस्पून 
बटर - २ टेबलस्पून 
नमक स्वाद अनुसार 
पानी 

विधि :

१) कढ़ाई में १ टेबलस्पून बटर डालकर उसमे सारे खड़े मसाले डाले दे जैसे दालचीनी , जावित्री ,बड़ी इलाइची और पिघलते हुए बटर क साथ इसे भी पकने दे , जब  मसालों की खुशबू आने लगे उसमे सारे कटे हुए टमाटर दाल दे , अब इसमें १ टीस्पून नमक और १ टेबलस्पून चीनी डालकर पकने दे। जब टमाटर पकने लगे इसमें दूध डाले और ३ से ४ मिं  पकने दे। ठंडा होने पर मिक्सर से मुलायम सी पेस्ट कर ले। 

२) अब दूसरी कढ़ाई में १ टेबलस्पून बटर डाले, गरम होने पर इसमें पीसी हुई काजू की पेस्ट और अदरक की पेस्ट डालकर २ मिं  तक पकाए। अब एक साथ सारी टमाटर की पेस्ट दाल दे और लगभग ४ से ५ मिं  तक धीमी आंच पे पकाए। अब इसमें लाल मिर्च पाउडर + धनिया पाउडर + १ टेबलस्पून चीनी और नमक डालकर पकाए।  जब इसे उबाल आने लगे तो गैस बंद कर दे। अब इसमें क्रीम डालकर और २ मिं पकाए।  अब इस ग्रेवी को एक बड़ी छन्नी  से छान ले इससे यह ग्रेवी एकदम रेशमी सी मुलायम होगी। 

३) छानी हुई ग्रेवी को वापस कढ़ाई में डालकर १/२ कप पानी डालकर एक उबाल अने तक पकाए , कसी  हुई कसूरी मेथी डाले एंड और टुकड़ा पनीर कसकर दाल दे ,इससे ग्रेवी को रेस्टोरेंट स्टाइल टेक्सचर आएगा। अब बसारे पनीर के क्यूब्स डालकर १ मं तक पकए।  पनीर डालने क बाद इसमें करची ज़्यादा न चलाए। 

४) कसूरी मेथी, कस हुआ पनीर और क्रीम डालकर गार्निश करे और किसी भी रोटी क साथ परोसे। 


Saturday, 9 July 2016

MICROWAVE vs OVEN

Both the types of ovens can be used for heating but have very different purposes. Conventional Ovens are good for any cooking that requires baking or browning of food. A microwave does not bake or brown properly but is good for re-heating, roasting and almost all other kind of cooking.  Microwaves are a good replacement for conventional cooking rather than to all types of cooking requiring ovens (like baking).


Microwave: A microwave heats water and molecules in the food by using microwave radiation. It will heat food efficiently and quickly, but does not brown or bake like a conventional oven. The cooking of food is from inside to outside.

Microwave always uses such kind of process that is known as dielectric heating that always causes the polarized molecules in the food for rotating and building up the thermal energy that results in the heating of the food efficiently and really very quick. The basic purpose of the microwave is to pre cook the food and also for the heating the slow cooking items like the butter chocolate and such kind of fats. Though, the microwave cannot be used for the professional cooking since the flavors produced for the purposes of frying or baking can’t be done with the help of the microwave.


Oven: Fueled by gas or electricity and heats from the bottom (baking, roasting) or from the top (broiling). The heat is from a single direction and not uniform
The cooking of food is from outside to inside.

Oven is one of the most common appliances that are used in the culinary world. There are so many kinds of ovens and among these types kilns and furnaces are used the most for metalworking and pottery that are really very different from their culinary cousins. Conventional oven is the best way for the making of the pizza or the cupcake or waffle. They are cooked perfectly in the oven as ovens are actually made for these things. In the conventional oven, the electric current flows with the help of the metallic elements for heating up the elements and then in turn it helps in cooking of the food properly. The thermostat that is present in the oven helps in the measurement of the temperature and it also adjusts the current through some kind of element that always maintains the temperature. Some ovens also have the fans that help in distributing the heat uniformly.

List of food cooked

Making pizza or cupcake or waffle:  Conventional oven
reheating burgers, pizza,  Microwave oven for the burger.  The cheese and toppings of pizza will heat much better in the microwave, but care should be taken not to let the crust get soggy -- put paper kitchen towel under the pizza or use a special dish that allows air to circulate under the pizza.
making stew:  The conventional oven will be slower, allowing melding of flavors, and will give the meat time to become tender.  The microwave oven will be faster.
Reheating stew:  The microwave oven will be much quicker.
Making chicken:  The conventional oven will brown the skin of the chicken, but will overcook the wings and legs in the time needed to cook the thicker body parts.  The microwave will cook the meat from the inside, leaving the skin soft and less enjoyable;  Areas near the bones may be overcooked.
Reheating chicken:  The microwave oven will be quicker.  Use of a covered dish and some added moisture will avoid overcooking.

Cooking and energy efficiency

Electricity contributes very little to the energy consumption in a kitchen. Cooking gas is a major component and we will discuss more on that in a future post. But we would certainly like to point out a few things over here:

A microwave consumes lesser energy (40% less) than a cooking gas, but cost of electricity is higher than cost of gas.
Compared to conventional oven microwave oven uses 75% less electricity for activities like cooking a potato.

Friday, 8 July 2016

DHABA STYLE CHCIKEN CURRY

Ingredients :


Chicken - 600  gms
Finely chopped onions - 2 cups
Finely chopped tomatoes - 2 cups
Ginger Garlic paste - 1tbspn
Hung Curd - 1/4 cup
Black Peppercorns - 3-4
Cloves - 3-4
Green cardamom - 2-3
Bay leaf- 1
Black cardamon- 1
Cinnamon stick - 1
Dried Red Chilly - 1
Red Chilli powder - 1 tspn
Coriander powder - 1 tspn
Turmeric powder - 1/2 tspn
Ghee - 1 tbspn
Oil - 4 tbspn
Salt as per your taste
Dried Fenugreek leaves - 1 tspn
Water

To marinate the chicken
Ginger garlic paste - 1 tbspn
Salt - 1 tspn
Red chilly powder - 1 tspn
Lemon Juice - 2 tspn
Charcoal - small piece

To brine the chicken
Water - 4 cups
Salt - 4 tablespoon

Directions :

1) Clean the chicken very well and add 4 cups of water and 4 tbspn of salt.Refrigerate this and keep for min 2 hrs.

2) After two hours, drain the chicken and wash again to remove the excess salt. Now marinate the chicken with Ginger - garlic paste, salt, red chilly powder and lemon juice and mix well. Place a steel bowl and keep the red hot burning charcoal and add 1 tspn ghee and cover with the lid and set it aside.

3) In a Deep pan, add ghee and drop all our dried spices viz. Cinnamon stick , cloves, black peppercorns, green and black cardamons and bay leaf, now put on the flame and let the ghee get hot and let our spices sizzles in slow heating ghee, this will enhance the flavors of the dry spices, ones you see the spices are aromatic and sizzling add the oil and let it get heated. Now in this hot oil add the ginger garlic paste and saute for a min. Now add onions and cook till dark brown on medium flame. No cheating in cooking the onions, have patience and cook it well.

4) Add the hung curd and cook it on very low flame till nicely brown, add tomatoes at this point and wait the tomatoes to cook and check till this paste leave the oil on the edges, it means the paste is cooked perfectly.

5) Now drop red chilli powder, turmeric powder, coriander powder and salt and mix till combined and cook for 1 -2 mins.

6) Increase the flame on high and drop our marinated chicken and mix till all the chicken is coated well and cook for 2 -3 mins till you see the change in color to whitish.Than add 1 to 2 cups of water and mix well and cover the lid for next 15 mins. Do not open the lid. Let it cook on the lowest flame.

7) Add the crushed fenugreek leaves and serve hot with paratha or naan or even phulka .

                                                                    हिंदी में 

सामग्री :

चिकन - ६००  ग्राम
बारीक कटा प्याज - २  कप
बारीक कटा टमाटर - २  कप
अदरक - लहसुन पेस्ट - १ टेबलस्पून
गाढ़ा दही - १/४ कप
काली मिर्च - ३- ४
लौंग - ३-४
छोटी इलाइची - २-३
बड़ी इलाइची - १
तेज पत्ता - १
दालचीनी - १
सुखी लाल मिर्च - १-२
लाल मिर्ची पाउडर - १ टीस्पून
धनिया पाउडर - १ टीस्पून
हल्दी - १/२ टीस्पून
देसी घी- १ टेबलस्पून
तेल - ४ टेबलस्पून
कसूरी मेथी - १ टीस्पून
नमक स्वाद अनुसार
पानी

चिकन को मॅरिनेट करने के लिए 
अदरक - लहसुन पेस्ट - १ टेबलस्पून
नमक - १ टीस्पून
लाल मिर्च पाउडर - १ टीस्पून
निम्बू का रस  - २ टीस्पून
कोयला - १ टुकड़ा

चिकन को ब्राइन करने के लिए 
पानी - ४ कप
नमक - ४ टेबलस्पून

विधि : 

१) चिकन को अच्छी तरह साफ़ कर ले, फिर उसमे ४ कप पानी और ४ टेबलस्पून नमक डालकर उसे फ्रिज में २ घंटे के लिए रख दे।

२) २ घंटे बाद चिकन को नमकीन पानी से निकलकर अच्छी तरह धो ले और मरिनशन के लिए अदरक -लहसुन पेस्ट, नमक,लाल मिर्च पाउडर और निम्बू का रस  डालकर अछि तरह मिला ले। अब इसमें एक कटोरी रखे और इसमें  गरम कोयला रखे और १ चम्मच घी डालकर अच्छी तरह ढक  दे।

३) अब एक कढ़ाई में घी डाले, और इसमें सारे खड़े मसाले डाले जैसे ,दालचीनी, लौंग, काली मिर्च, छोटी और बड़ी इलाइची और  एक तेज पत्ता, अब गैस को ऑन करे और मध्यम  आंच पर घी को गरम होने दे।  इस से सारे खड़े मसले घी के गरम होते होते अपना स्वाद और खुशबू अच्छी तरह घी में आएगा। जब सारे मसाले पकने लगे उसमे तेल डाले, और फिर अदरक लहसुन का पेस्ट डालकर १ मिं  तक भुने, फिर प्याज डाले और प्याज को  अच्छी तरह सुनहरा होने दे, इस सब को धीमी आंच पे पकाए , प्याज भूरा होना चाइये लेकिन ध्यान रहे की जले नहीं।

४) अब इसमें दही डालकर अच्छी तरह धीमी आंच पर भून ले, जब यह मसाला अच्छा भूरा दिखे इसमें टमाटर डाले और अच्छी तरह पकाए। इस सब मसलों को तब तक पकाए जब तक  इसमें से तेल अलग छूटने लगे , समाज लीजिए आपका मसला पाक चूका है।

५) लाल मिर्च पाउडर , हल्दी , धनिया पाउडर और नमक डालकर १- २ मिं  तक पकए.

६) अब गैस की आंच तेज कर दे और इसमें हमारा मरिनेटेड चिकन दाल दे और अच्छी तरह मिले ले, आप देखेंगे की चिकन का रंग सफ़ेद हो रहा है इसमें पानी डाले, सबसे धीमी आंच  पर १५ मिं  के लिए ढक कर रख दे। ढक्कन को १५ मं तक नहीं खोले।

७) १५ मिं  बाद , ढक्कन खोल के देखे, चिकन पक  चूका होगा , अगर नहीं पका  तो थोड़ी देर और पकने दे, फिर, कसूरी मेथी डालकर गरमा गरम परोसे।


Wednesday, 6 July 2016

HOT GARLIC NOODLES

Ingredients :

Noodles - 1 packet
Garlic crushed - 10- 12 cloves
Carrots julienne - 1 whole
Sliced Onion - 1/2 cup
Thinly Sliced Capsicum - 1 medium sized
Cabbage thinly sliced - 1 Cup
Green Chillies Sliced - 3 to 4
Spring Onion greens chopped - 1/2 cup
Soya Sauce - 1 tablespoon
Red chilli Sauce - 3 tablespoon
Vinegar - 2 tspn.
Salt - As per taste
Black pepper crushed - 1 tspn
Oil - 4 tbspn

Directions :
1) In a boiling water ,add the packet of noodles and let it cook for 3 to 4 mins, we need to keep the noodles 80%, otherwise it can become mushy later. Later, drain d water and add cold water to stop the cooking process of the noodles. Toss the noodles with 1 tbspn of oil and coat well, handle with care, do not mix with spoon , use tongs or fingers would be the best and set aside.

2) Heat a wok on a high flame, add oil, when oil is heated, add the crushed garlic saute it till it turns golden brown and add green chillies, then add onions saute for a min, add carrots, capsicum, cabbage respectively and saute each veggie for a min on high flame. Sauteing on high flame is important here. that d trick of the restaurant style noodles. 

3) Now drop all our sauces, soya, red chilly and vinegar and toss well till all our veggies our coated with the sauces, If you can, toss all the veggies with the help of the handle of the wok and do not use spoon, let the flame of the gas touch the veggies while sauteing,(see video be very careful, it needs practice) Do this process for 1 min, your home will be aromatic like a Chinese restaurant for sure. 

4) Drop all the noodles and toss well, add salt ,Crushed blackpepper, red chilli flakes (optional)and spring onions and toss well for a min or two. 

5) Garnish with spring onions greens and green chillies and serve piping hot with any Manchurian or veg balls or eat it simply....


                                                                हिंदी में
सामग्री :
नूडल्स - १ पैकेट
लेहसुन  - १० - १२ कली कुचली हुई
गाजर बारीक लम्बी कटी - १/२ कप
बारीक कटा प्याज - १
बारीक कटी शिमला मिर्च - १
पत्ता गोभी - १ कप
हरी मिर्च लम्बी कटी - ३ से ४
हरा प्याज बारीक कटा - १/२ कप
सोया सॉस - १ टेबलस्पून
रेड चिल्ली सॉस - ३ टेबलस्पून
विनेगर - २ टीस्पून
नमक स्वाद अनुसार
काली मिर्च कुटी हुई - १ टीस्पून
तेल - ४ टेबलस्पून

विधि :
१) उबलते हुए पानी में १ पैकेट नूडल्स डाले और ३ से ४ मिं तक पकए , ध्यान रखे की नूडल्स ज़्यादा गले नहीं । उसके बाद एक बड़ी छन्नी में नूडल्स छान ले और पानी अलग कर ले , और ठंडा पानी इन नूडल्स पर डाले। इससे नूडल्स और ज़्यादा नहीं पकेंगे। अब १ टेबलस्पून तेल लेकर सारे  नूडल्स पे हाथ से लगा ले, इस से नूडल्स एक दूसरे को चिपकेगी नै।

२) तेज आंच पर कढ़ाई रखे फिर तेल डाले और अच्छी तरह गरम होने दे, अब नूडल्स डालने तक सारा काम तेज आंच पे ही करे। अब गरम तेल में लेहसुन डाले और गोल्डन होने तक पकाए फिर हरी मिर्च डाले  फिर प्याज , गाजर, शिमला मिर्च, पत्ता गोबी एक एक कर के डाले, और हर एक सब्जी डालने क बाद १ मिं तक भुने।

३) अब सारे सॉस दाल दे, सोया, रेड चिल्ली और विनेगर भी डाले। और हैंडल पकड़ कर कढ़ाई को हिलाये जब तक साडी सब्जियों को सरे सॉस लग जाये। (वीडियो देखे, यह बड़ी सावधानी से करे ) इस से रेस्टोरेंट जैसा स्वाद आएगा।

४) एक साथ सरे नूडल्स दाल दे और अछि तरह फिर हिलाये, चम्मच का उपयोग न करे, चिमटे से नूडल्स को हिलाये इस से नूडल्स टूटेगी नहीं। अब नमक और काली मिर्च डालकर और हरा प्याज डालकर अच्छी तरह मिला ले।

५) थोड़ा हरा प्याज, हरी मिर्च डालकर गरमा गरम परोसे।


Monday, 4 July 2016

ZEBRA CAKE

Ingredients :-


Vanilla Sponge
Flour - 1 + 1/2 C ( 187 gms)
Salt - 1/4 tspn
Baking powder - 1 tspn
Butter - 50 gms (1/2 stick)
Oil - 50 gms
Sugar - 1/2 C (100 gms)
Eggs - 2
Vanilla essence - 1 tspn
Milk - 120 ml
Chocolate sponge
Coco powder - 1+1/2 Tblspn
Sugar - 1/2 Tblspn
Milk - 4 Tblspn

Directions :
1) Grease the Cake tin (7 inch or 8 inch) and line it with the Butter paper or parchment paper. Preheat the oven 180 degree C

2) In a bowl sift the plain flour, baking powder and salt and mix till combined.

3) In a large mixing bowl, whisk butter, oil and sugar (100 gms) till creamy, gradually add one egg at a time and whisk till foamy (approx 2 mins) and add vanilla essence and whisk for 30 secs.

4) Now add flour mix and milk alternating for 3 times. Do not over mix. (whisk approx 2 mins.)

5) In another bowl take coco powder, sugar, milk and mix generously till sugar dissolves and you will get thick chocolaty paste.

6) Add 2 tbspn of the vanilla batter in this coco mixture and stir till combined. When combined now add half of the vanilla batter in the coco batter and mix till nicely incorporated.

7) Now we have two batters 1) Vanilla (white) 2) Choc batter ( chocolaty).Now take a teaspoon of white batter and drop in the center of the cake tin, then the choc batter and drop again in the center of white batter and repeat the same process till you end with both the batters.

8) Bake this beautiful Zebra swirls for 20 - 22 mins, or toothpick inserted in the center should come out clean. Let it cool for 10 min on a cooling rack.

9) Serve and impress everyone.


                                                                            हिंदी में 


सामग्री :

वैनिला स्पंज के लिए
मैदा - १+१/५ कप (१८७ ग्राम )
नमक - १/४ टीस्पून
बेकिंग पाउडर - १ टीस्पून
बटर - ५० ग्राम
तेल - ५० ग्राम
शक्कर - १/२ कप (१०० ग्राम )
अंडे - २
वैनिला एसेंस - १ टीस्पून
दूध - १२० मिली

चॉक्लेट स्पंज
कोको पाउडर - १+१/२ टेबलस्पून
शक्कर - १/२ टेबलस्पून
दूध - ४ टेबलस्पून

विधि :
१) केक टिन को थोड़ा मक्खन लगा के ग्रीज़ करे और पार्चमेंट पेपर बिछाए. ओवन को १८० C पे प्री हीट करे.

२) एक छन्नी से मैदा, बेकिंग पाउडर और नमक छान  कर रख दे।

३) अब एक बड़े कटोरे में ,बटर, तेल , शक्कर (१०० ग्राम ) डाल  कर अच्छी तरह फेट (व्हिस्क) ले। अब एक अंडा डाले और फिर से अच्छी तरह फेंटे ,अब दूसरा अंडा डाले और १ मिं तक फेंटे।  यहाँ मिश्रण एक गाढ़ी और बुलबुली दिखनी चाइये, अब इसमें वैनिला एसेंस डाले और ३० सेकंड तक फिर। ( अगर इलेक्ट्रिक व्हिसकर हो तो फेंटने की पूरी प्रक्रिया बस २ मं हो उससे ज़्यादा न फेंटे। और हाथ से फटेंगे तो ५ मिं तक व्हिस्क  करे.  )

४) अब ३ हिस्सों में हमारा मैदा मिश्रण और दूध डाले. एक बार मैदा और दूध डाले और फेंटे जब यह अच्छी तरह घुल जाए तो बाकि क २ हिस्से डाले। ध्यान रहे ज़्यादा न फेंटे।

५) दूसरे कटोरे में कोको पाउडर, शक्कर, दूध डालकर अच्छी तरह मिलाए ,जब तक शक्कर घुल जाए और एक गाढ़ी पेस्ट दिखे।

६) अब २ टेबलस्पून हमारा वैनिला केक का बेटेर  ले और चोको मिक्स में डाले एंड मिला ले। जब अच्छी तरह मिल जाए तब वैनिला बटर से आधा हिस्सा चोको मिक्स में डाले डालकर मिला ले.

७) इस तरह अब हमारे पास २ केक मिक्स है :१) वैनिला २) चॉक्लेट।  अब १ टीस्पून  वैनिला केक मिक्स केक इन के बीच में डाले , अब चॉक्लेट केक मिक्स दूसरी टीस्पून से वैनिला केक मिक्स के ऊपर से बीच में डाले। इसी प्रकार एक एक चम्मच दोनों केक मिक्स बारी बारी से खत्म होने तक डाले।

८) अब इस ज़ेबरा जैसे दिखने वाले केक मिक्स को २० - २२ मिं  तक बेक करे. बहार निकल के १० मिं  ठंडा होने दे।

९) ताज़ा बन केक सबको खिलाए और तारीफे पाये.